Manage Sources
Alation Cloud Service Applies to Alation Cloud Service instances of Alation
Customer Managed Applies to customer-managed instances of Alation
Important
You are viewing documentation for Alation’s Classic User Experience.
The Sources page in Alation serves as a central hub for managing data sources. Its primary functions include:
Adding New Sources: Facilitates the integration of various data systems into Alation.
Viewing Existing Sources: Provides a comprehensive list of currently connected sources.
It is important to note that the specific options and layout of the Sources page may differ depending on the user experience configured within Alation.
Classic User Experience
In Classic User Experience, you can add any source type, browse all the existing sources, and manage the settings on the Sources page. To view the menu options, go to Apps > Sources.
Add Sources
Alation allows users to connect their sources through the Sources menu.
Create a Data Source
To add a new data source:
Log in to Alation as a Server Admin.
Expand the Apps menu on the right of the main toolbar and select Sources.
On the Sources page, click +Add on the top right of the page, and in the list that opens, click Data Source. The Add a Data Source wizard appears.
On the wizard’s first screen, specify a name for your data source, assign additional Data Source Admins, if necessary, and click the Continue Setup button at the bottom. The Add a Data Source screen will open.
The only field you should populate on the Add a Data Source screen is Database Type. From the Database Type dropdown, select the connector name. After that, you will be navigated to the Settings page of your new data source.
Create a BI Source
To add a new BI source:
Log in to Alation as a Server Admin.
Expand the Apps menu on the right of the main toolbar and select Sources.
On the Sources page, click +Add at the top right, and in the list that opens, click BI Server. The Register a Business Intelligence Server screen will open.
From the Select a Business Intelligence Server type list, select the OCF connector. The connector name appears on this list only after it has been installed.
Specify a Title and a Description (optional) for your BI source.
Click Add. You will be navigated to your new BI Server source Settings page.
Create a File System
To add a new file system source:
Log in to Alation as a Server Admin.
On the top right, click Apps > Sources.
On the Sources page that opens, click Add on the top right, and select File System from the list of source types. The Add a File System screen will open.
From the File System Type dropdown, select the appropriate connector.
Provide a Title for your file system source and click the Add File System button. You will be navigated to the Settings page of your new file system source.
Create an ELT Source
To add a new ELT source:
Log in to Alation as a Server Admin.
On the top right, click Apps > Sources.
On the Sources page that opens, click Add at the top right, and from the list of source types, select ELT Source. The Add ELT Source screen will open.
Enter details for the title and description.
Select the connector from the dropdown and click on Add Source. You will be navigated to the Settings page of your new file system source.
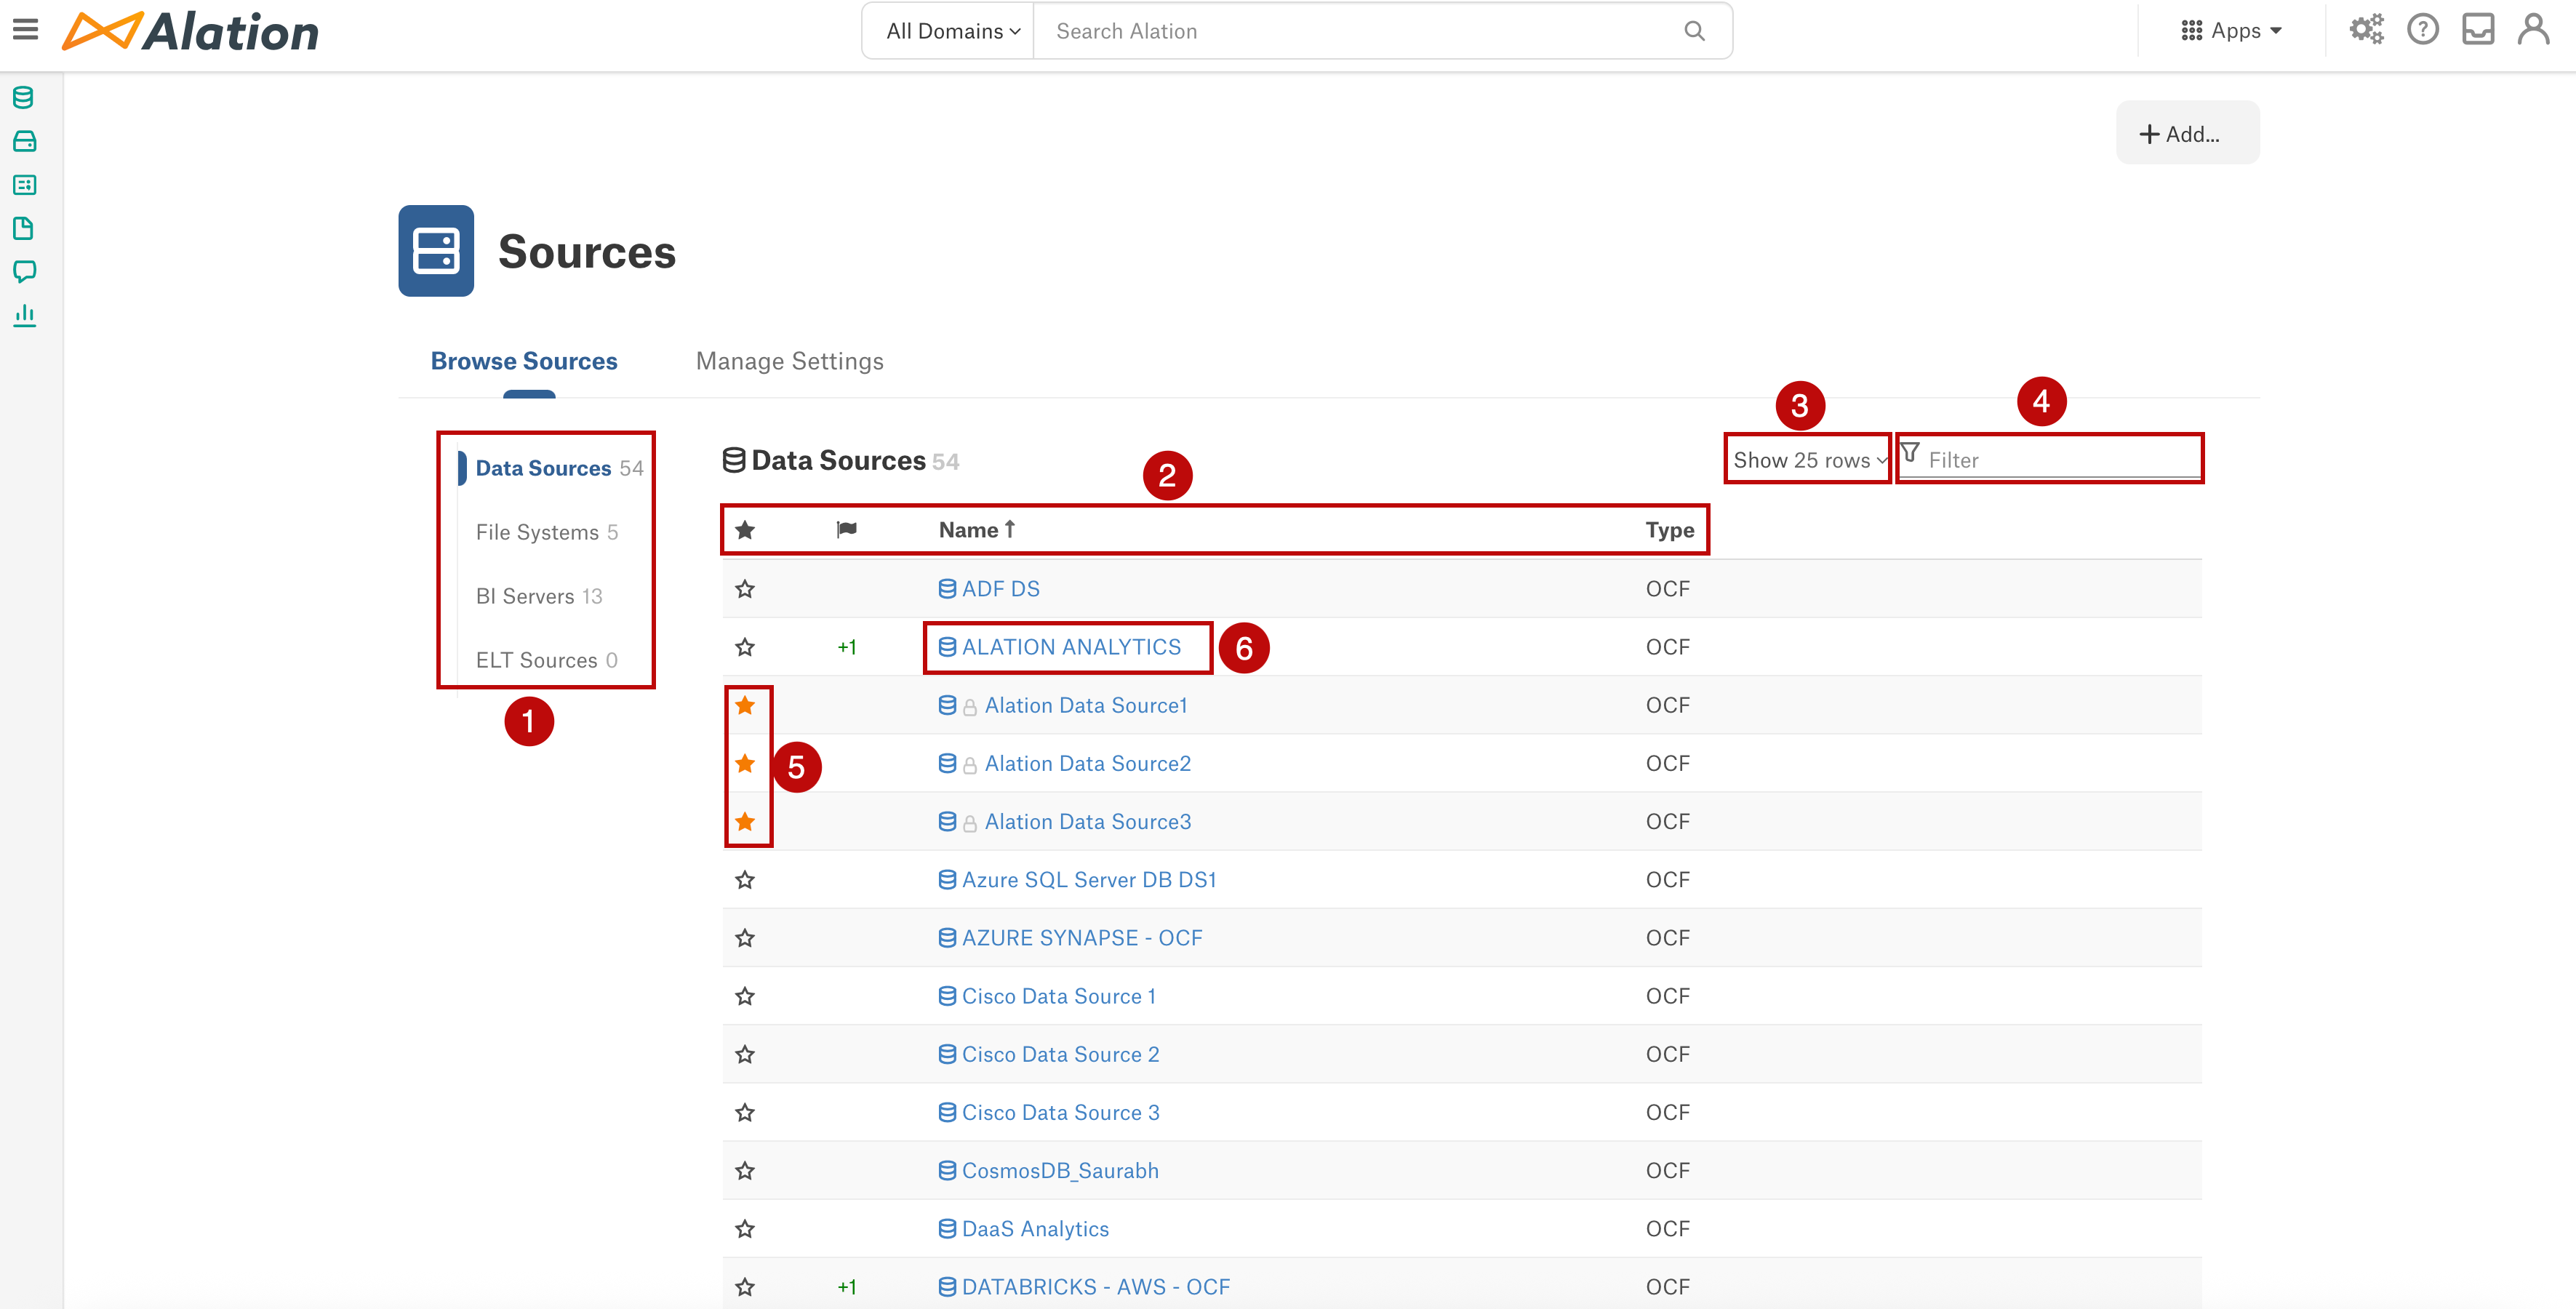
Browse Sources
The sources added to the Alation catalog are listed under Sources > Browse Sources tab. The Browse Sources tab only displays sources with a completed setup.
On this tab, you can:
Region 1. From the left-hand menu, select a source type to view its details:
Data Sources (database sources and virtual data sources)
File Systems
BI Servers
ELT Sources
API Resources
Region 2. You can sort the list of available sources by Flag, Name, or Type by clicking the respective column header or icon.
Sorting by Flag arranges sources based on a score derived from the sum of their endorsements and deprecations, viewable in ascending or descending order.
Each endorsement a source receives contributes +1 to its Flag score.
Each deprecation a source receives contributes -1 to its Flag score.
Examples of Flag Scores:
Two endorsements: +2
Two deprecations: -2
Two endorsements and one deprecation: +1
See Using Trust Flags Proceed With Confidence for details on flagging data objects.
Region 3. To adjust the number of rows displayed per page, select your preferred option from the Show # Rows list in the top-right corner.
Region 4. Locate a specific source by typing its name into the Filter field (top-right corner). The list will dynamically filter to match your text as you type.
Region 5. Click the star icon next to a data source to mark it as a favorite.
Region 6. Each source title in the table links to its dedicated catalog page; click the title to open it.
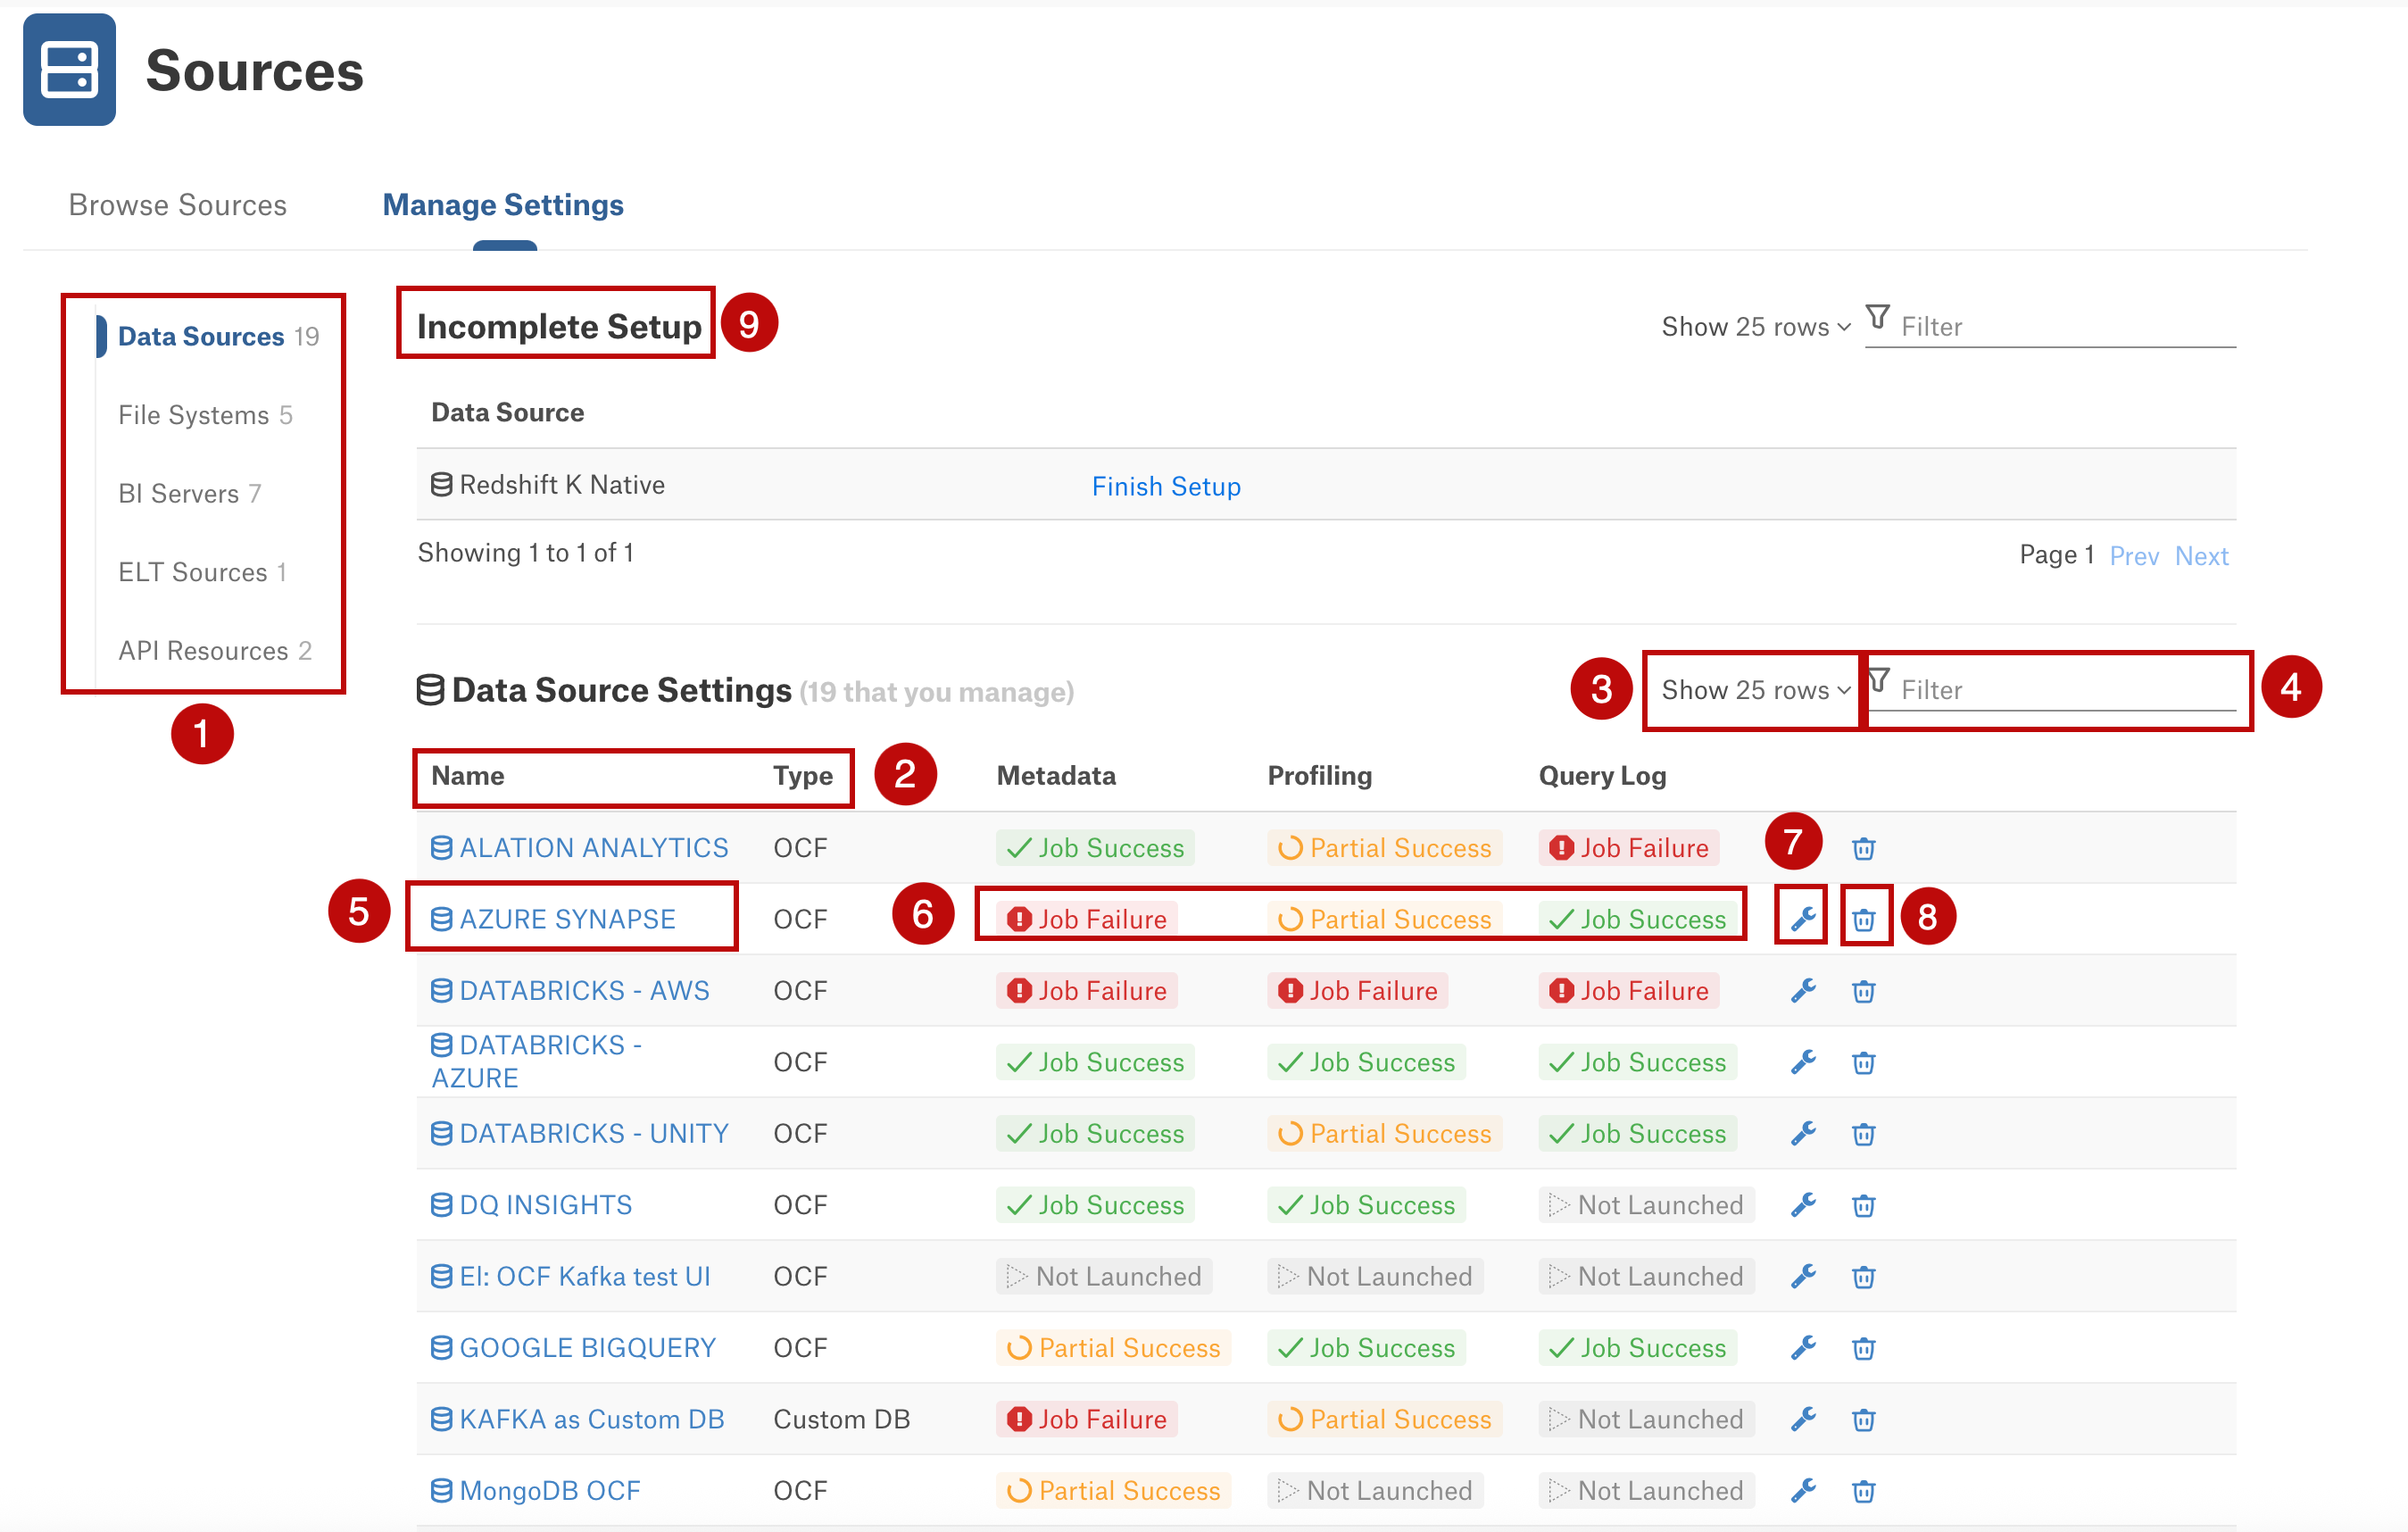
Manage Settings
The Manage Settings tab offers a streamlined way to access and modify data source settings on the Sources page. You can use this tab if you are a Server Admin or a Data Source Admin for at least one source.
Note
By default, Server Admins can manage all Public data sources. Other users, acting as Data Source Admins, can only manage the specific data sources to which they’ve been assigned that role. See Configure Access to OCF Data Sources for more information.
Be aware that the settings and options in the Manage Settings tab will vary depending on the source type you select from the list on the left.
On this tab, you can:
Region 1. Use the left menu to select a source type to view:
Data Sources (database sources and virtual data sources)
File Systems
BI Servers
ELT Sources
API Resources - Manage settings does not apply to API resources, as they can be managed only through the API.
Region 2. Sort the list of available sources by Name or Type by clicking the respective column header or icon.
Region 3. To adjust the number of rows displayed per page, select your preferred option from the Show # Rows list in the top-right corner.
Region 4. Locate a specific source by typing its name into the Filter field (top-right corner). The list will dynamically filter to match your text as you type.
Region 5. Each source title in the table links to its dedicated catalog page; click the title to open it.
Region 6. Each feature status column links to its dedicated settings page; click the status to open it. These columns will vary depending on the source type, as mentioned below:
Data source - Metadata Extraction, Profiling, and Query Logs
File System - Not applicable
BI Servers - Extraction Status
ELT Sources - Metadata and Lineage
Region 7. Click the wrench icon for quick access to the source settings.
Region 8. Click the delete icon to delete the source. See Delete an OCF Connector for more details.
Region 9. The Incomplete Setup section lists sources that are not yet fully configured. Server Admins have complete visibility of all partially configured data sources. However, they can only complete the setup for public data sources or those for where they are designated as Data Source Administrators. Other users can only see and finalize the setup of incomplete sources for which they are Data Source Administrators. To finalize the setup for any of these sources, click Finish Setup.
New User Experience
A left-side navigation pane appears on every screen. This menu provides entry points to landing pages for different source types, including Data Sources, File Systems, and Business Intelligence, along with links to other parts of the catalog. The left-side navigation pane serves as your primary hub for interacting with data sources, providing access to key areas and actions within the catalog.
Add a New Source
You can initiate adding a new source into your Alation catalog. This involves selecting the appropriate OCF connector from the list of installed connectors and then providing connection details and configuration specifics.
Creating Data Source
In Alation, add a new data source:
Log in to Alation as a Server Admin.
On the Data Sources page, click +Add at the top right, and in the list that opens, click Data Source. This will open the Add a Data Source wizard.
On the first screen of the wizard:
Specify a name for your data source, and assign additional Data Source Admins, if necessary.
Proceed with the default option I’m setting up this Data Source if you want to configure the connector. Select Ask the Data Source Admins to complete the set up button if you wish other data source admin to finish the set up.
Click the Add Source button at the bottom. You will then be redirected to your new data source’s Settings page.
Create a BI Source
In Alation, add a new BI source:
Log in to Alation as a Server Admin.
On the BI Servers page, click +Add BI Server at the top right. The Register a Business Intelligence Server screen will open.
From the Select a Business Intelligence Server type list, select the OCF connector. The connector name appears on this list only after it has been installed.
Specify a Title and a Description (optional) for your BI source.
Click Add. You will be navigated to your new BI Server source Settings page.
Create a File System
To create a new file system source:
Log in to the Alation instance.
On the File Systems page, click +Add at the top right. The Add a File System screen will open.
From the File System Type dropdown, select the appropriate connector.
Provide a Title for your file system source and click the Continue Setup button. You will be navigated to the Settings page of your new file system source.
Create an ELT Source
In Alation, add a new data source:
Log in to Alation as a Server Admin.
From the Catalog menu on the left-side navigation, select ELT Sources.
Click Add ELT Sources.
Enter details for the title and description.
Select the connector from the dropdown and click on Add Source. You will be navigated to the Settings page of your new file system source.
Browse All Existing Sources
Once you land in the Data Sources menu, you can explore of your entire inventory of currently cataloged data sources. You can typically view the sources’ Title, Description, and Type and often filter or search within these categories to quickly locate specific sources.
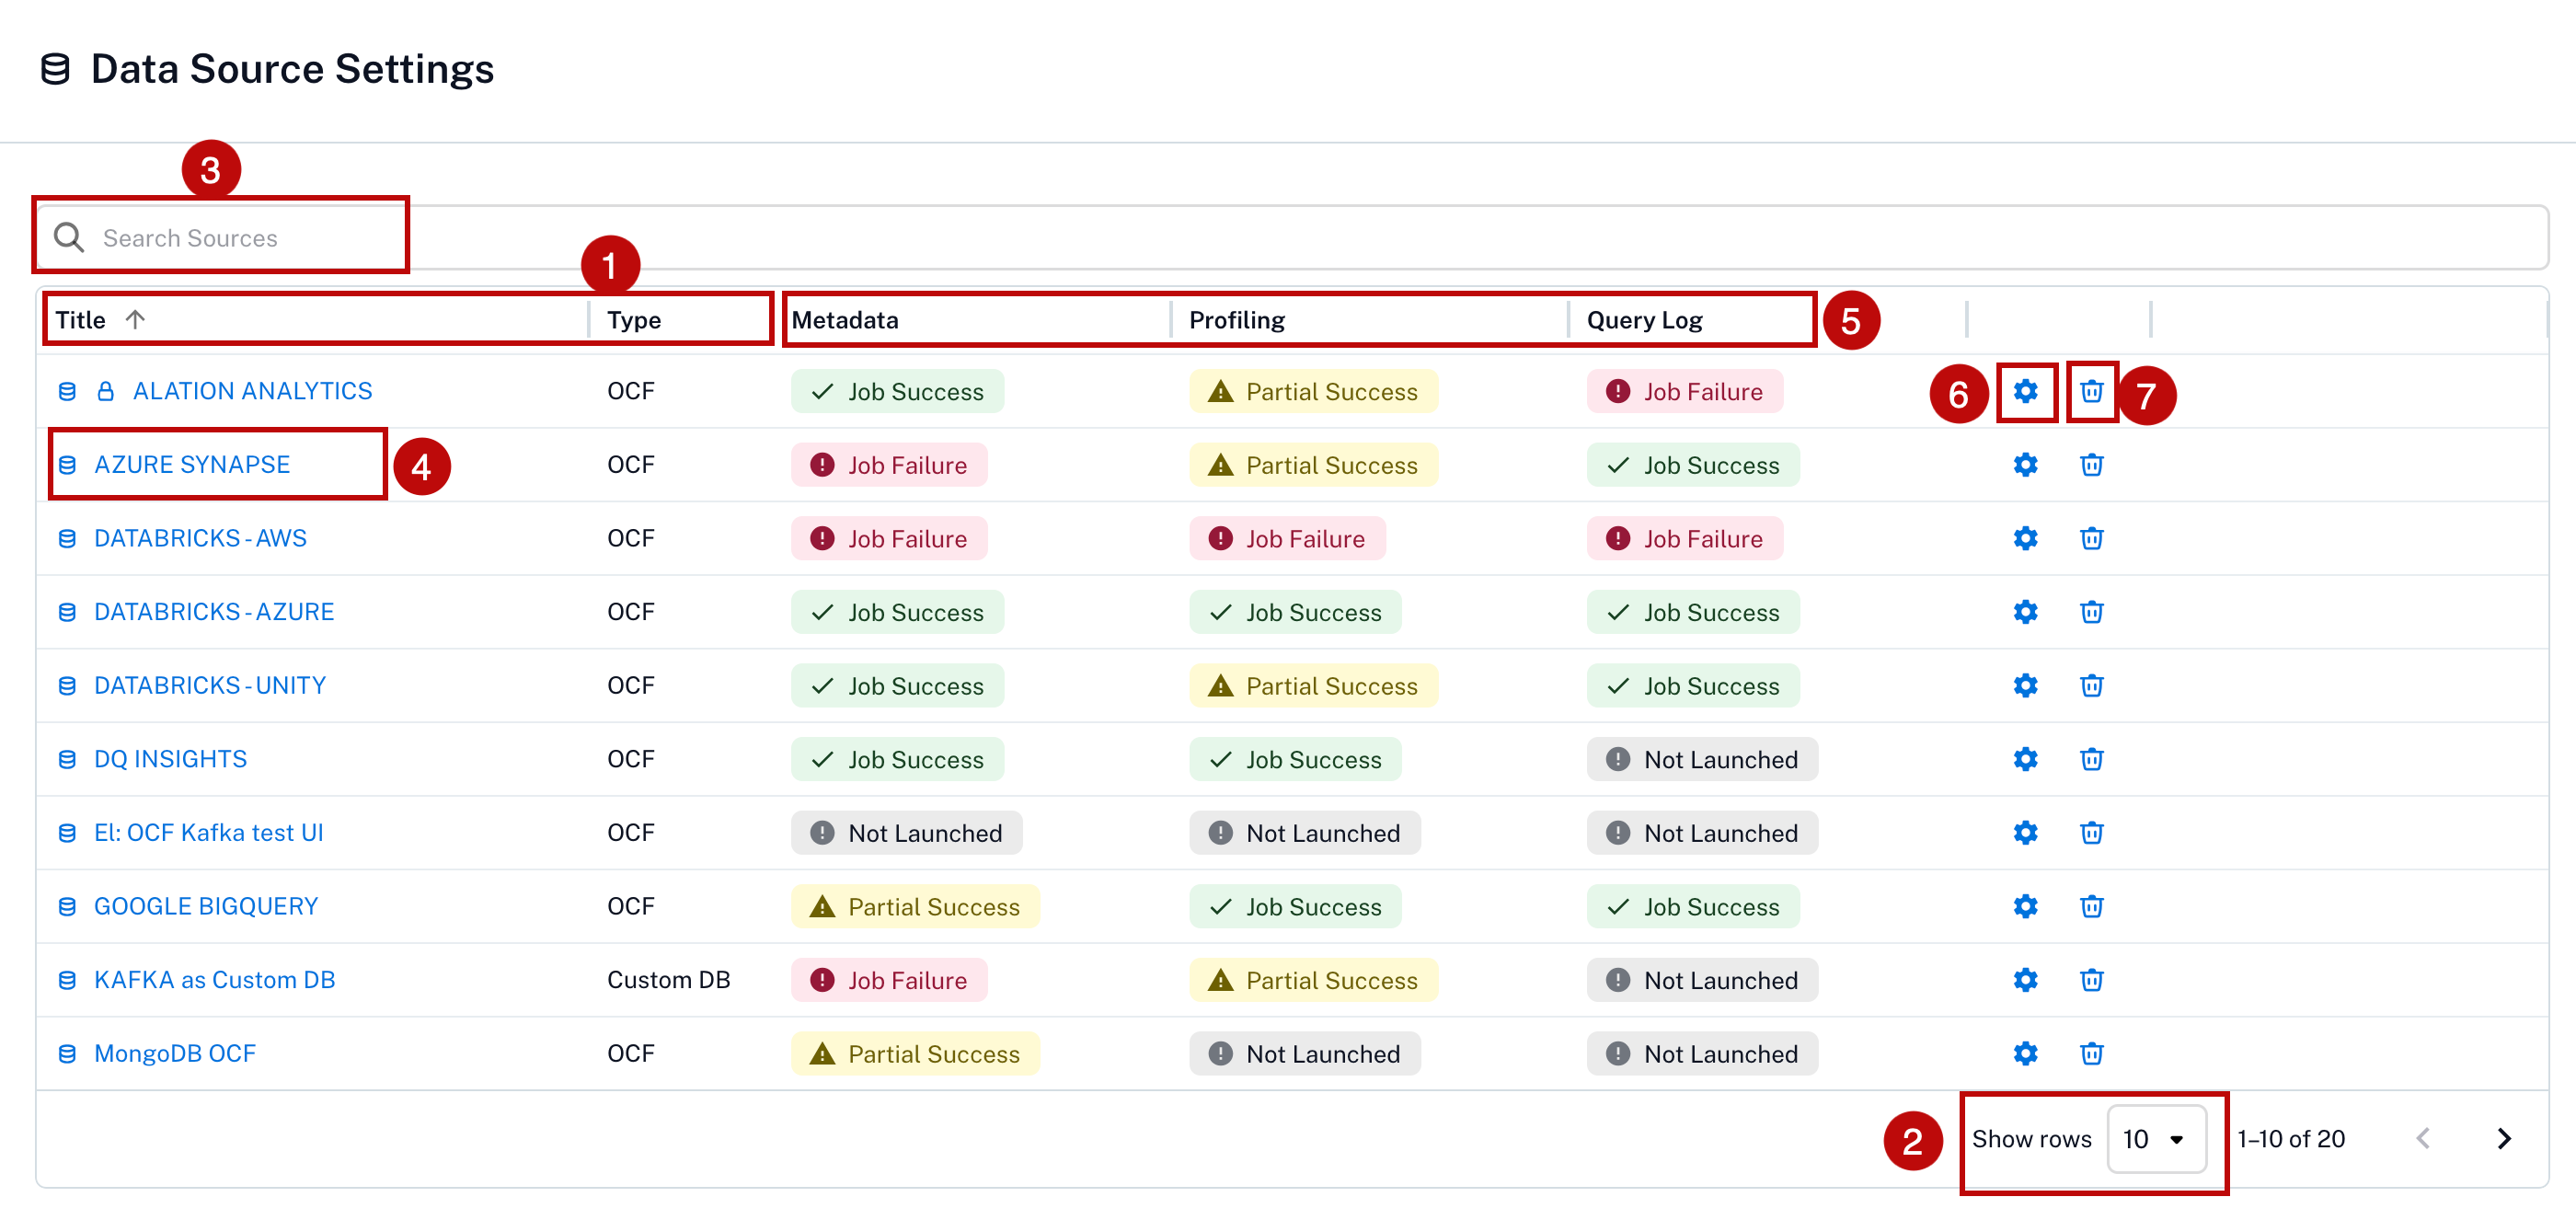
Manage Settings
The Manage Settings page offers a streamlined way to access and modify data source settings. You can use this page if you are a Server Admin or a Data Source Admin for at least one source.
Note
By default, Server Admins can manage all Public data sources. Other users, acting as Data Source Admins, can only manage the specific data sources to which they’ve been assigned that role. See Configure Access to OCF Data Sources for more information.
Be aware that the settings and options in the Manage Settings page will vary depending on the source type.
On this tab, you can:
Region 1. Sort the list of available sources by Title or Type by clicking the respective column header or icon.
Region 2. To adjust the number of rows displayed per page, select your preferred option from the Show rows list.
Region 3. Locate a specific source by typing its name into the Search Sources field. The list will dynamically filter to match your text as you type.
Region 4. Each source title in the table links to its dedicated catalog page; click the title to open it.
Region 5. Each feature status column links to its dedicated settings page; click the status to open it. These columns will vary depending on the source type, as mentioned below:
Data source - Metadata Extraction, Profiling, and Query Logs
File System - Not applicable
BI Servers - Extraction Status
ELT Sources - Metadata and Lineage
Region 6. Click the settings icon for quick access to the source settings.
Region 7. Click the delete icon to delete the source. See Delete an OCF Connector for more details.
Note
Incomplete Setup section appears only for BI Sources, File System Sources and ELT Sources.